ARYouThereYet
Published:
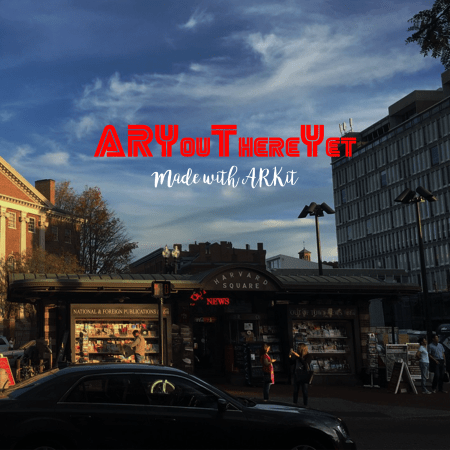
Here is the video of the app in action.
ARYouThereYet is an iOS application aimed towards the augmented reality experience. The application uses Apple’s ARKit library to generate augmented reality objects and nodes. The application is a location and navigation based experience built primarily for pedestrians walking on city streets and want to find establishments that may interest them. The application uses Google’s Places API, Mapbox API, and Apple’s CoreLocation framework to get location data whenever needed. A typical use-case for this application would be:
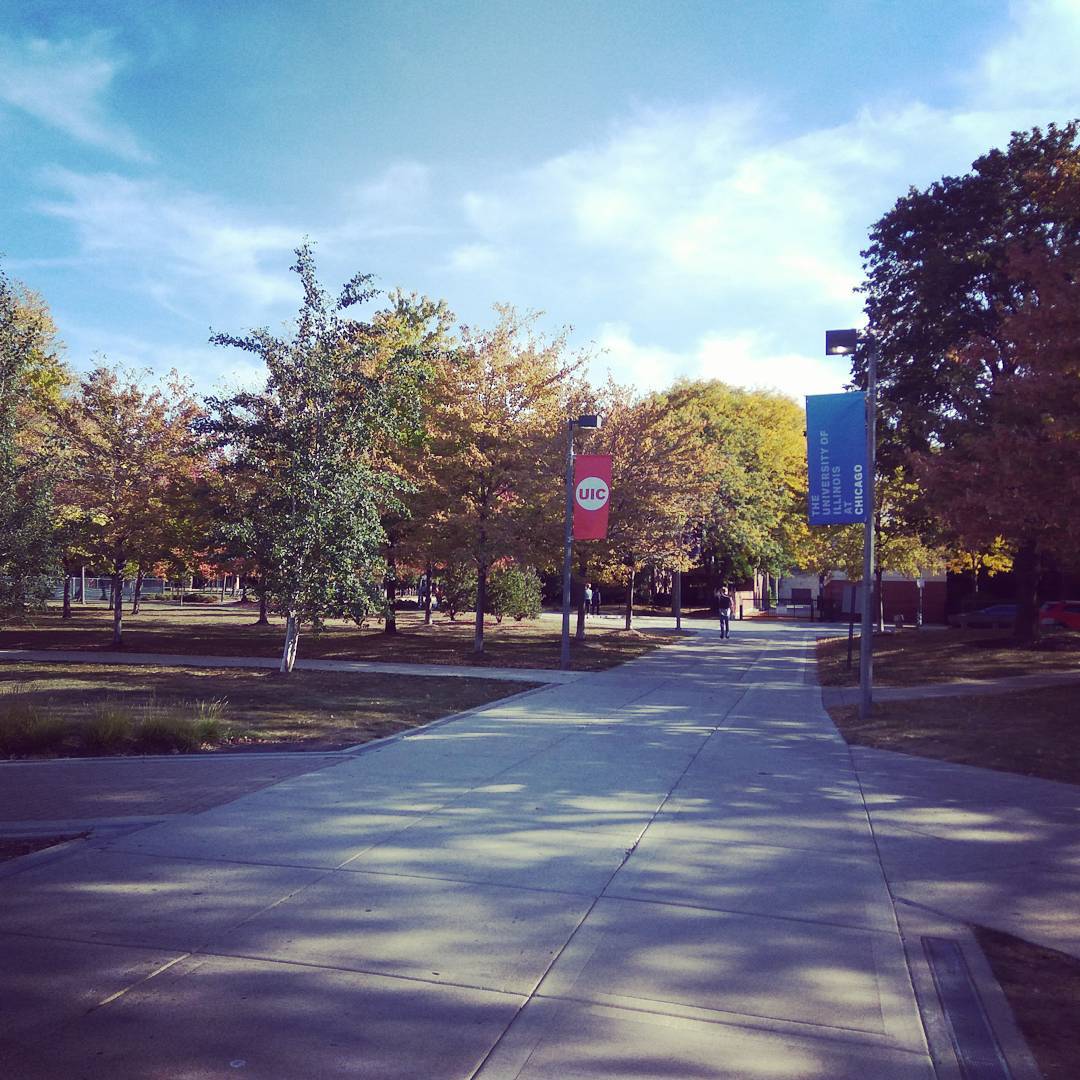
Imagine a young adult walking through Chicago who has never been there and wants to explore the city. He then goes to downtown to explore the city. As he is walking through North Michigan Avenue, he feels hungry and wants to find some restaurants. However, his map application does not direct him exactly toward the location because it cannot detect orientation that well. That is when he uses ARYouThereYet to filter restaurants or even look at all the types of establishment incase he wants to find some interesting places. He can navigate there while walking with nodes guiding him towards the end location and will know when he starts that how far is destination really is. He can also favorite some places that he really likes, then access them later, and quickly navigate to those places from the navigate view. Let us dive deep into the features and see what the application can do.
Features:
Load live Google Places data using Google Places Web Services API: We used the Google Places Web Service API as well as Google Places iOS SDK API to access location data and load nodes based on nearby establishments including restaurants, universities, cafes, etc. On average, the API request call (NSDataTask or Alamofire) returned about 20 establishments for us to display on to the ARScene view. This number can decrease if filters are applied and if more than one filters are used, 2 more subsequent API calls are made which increase the number of nodes from a possible 20 to a possible 60.
Dynamically instantiate SCNNodes based on response from API calls: SCNNodes are generated using DispatchMain queue on the main thread and nodes are generated asynchronously. This is done asynchronously because we do not want the whole application for every node to be generated before the user can perform any other option. If this was done synchronously or in order, then the application would basically be unusable until all the nodes in the application are rendered.
Parse JSON data into data modals (Annotation) for access and use later: When calling the Google Places Web Services API, data is returned in the form of JSON data. We parse the data into a NSDictionary, create an Annotation class that stores the appropriate information as properties of the class, then attach that class data to each node. This class can be reused for multiple purposes and is versatile. Dynamically generated detailed view with parsed data: A detailed view is generated that includes the place’s name, address, icon (type of place), website, phone number, distance, and photos describing the place. The view is generated whenever the user taps on the mini-annotation nodes in the ARScene. The generated detailed view is put slightly ahead of the user so that the user can easily read the information and interact with the view however he/she likes. The user can also press a button to go back to the main view, favorite the place for later access, and even navigate to the place using our navigation controller.
Constraints on detailed view based on received data: Constraints are placed on the detailed view depending on if the location has photos or not. If photos are not present, a different detailed view is generated to accommodate for the change and give the user a feeling of continuity.
Access node property and enable interactions on nodes using hit tests: When the main nodes are tapped, there is a UITapGestureRecognizer to detect what and where the user has tapped on the AR scene. This helps us detect what node was pressed and what information needs to be presented to the user. This basically also helps the user in tapping the object easier when compared to just tapping random nodes. Navigation view of place chosen with SCNNodes to show the path: We created a navigation view that is split into an ARScene and a Mapbox map view that helps the user navigate to the desired place. There are nodes placed in the AR view indicating where the user must start the journey, where he needs to travel, where he must turn, and where is the destination node of the place. In the midst of travelling, the user can decide to change the destination by going back to the main view OR long pressing on the map view to change destination manually and on the fly.
Integration of MapBox API for path selection: Path selection towards the destination in the navigation view is done using Mapbox’s API. We decided not to use Google’s API for two reasons. Firstly, we already were calling Google Places API quite often and did not want to burden our application request limit with more requests. Secondly, Google’s fair usage policy actually prevents asking for live navigation data as part of their usage policy. Plus, Mapbox had better integration with iOS as it is. Thus, we decided to use Mapbox for our path selection queries.
Integration of Turf and Polyline to determine optimum path selection: We then used Turf and Polyline to generate paths to translate them into SCNNodes to display for the user. Usage of the libraries helped to ease the conversion from location data into AR nodes. Custom made nodes for navigation view: The navigation view has custom nodes for start location, destination location, turn left/right, and poly locations. We also customized the count to make the intermediary nodes appear every 20 meters. This eases the burden on ARKit as well as prevents the user from getting inundated with nodes in the AR view.
Long press on the mapView to select another location on the fly, the nodes get replaced: When in the navigation view, the user can long press on the map at desired location and the navigation will change to reflect the changes. Old nodes will be destroyed and new directions will be fetched and translated into relevant nodes.
Optimization to keep a steady 60 frames per second: When nodes are generated, their data is kept only to the extent of their lifetime. Only scenes the user can see are loaded into memory, otherwise the garbage collector removes them. This helps us maintain a steady 60 frames per second experience for the user. The only downside would be, when changing views, there is a momentary flicker of the camera as it adjusts to the new view. This can be attributed to a ARKit issue for now.
Change annotation view color based on distance: The main annotations in the primary view are colored according to the distance of the establishment. If the place is 0-200 meters away, then the annotation of that place is green. If the distance is between 200-500 meters, the annotation is yellow color. Otherwise, the annotation is red indicating the place is more than 500 meters away.
Implemented AutocompleteSearchViewController from Google to navigate to other places with autocompletion: Implemented Google’s AutocompleteSearchViewController from their iOS SDK. The autocomplete search view provides a way for users to search for places with the places being generated based on their input. The user can then select a place and navigate to the location using our navigation controller. This autocomplete search is powered completely by Google and only the interface was implemented in the application.
MapView mode changes based on time of the day: The mapview in the navigation changes from light to dark and vice versa depending on the time of the day. If it is still bright outside, the mapview color will be light. Otherwise, a dark style is applied to the map view. This is to ease the user experience and brightness.
Filter the types of places you want to see (saved): You can choose upto three filters from a whole list of filters including restaurants, cafes, universities, etc. The filters are saved. That means, when you exit the view and come back to it, the selections are still there. We limited the number of filters to 3 to prevent the creation of too many nodes. Another reason is that too many filters would require too many API requests leading to a unsavory user experience.
Filter the distance you want to see: The user can use the distance slider to select from 200m to 1000m. This generates any place (or in combination with the place type filter above) in this vicinity. You can mix and match place types and distance to customize the nodes you wish to see.
Current weather information is displayed as UI element/AR object: The application calls OpenWeather API to get the current temperature at the location the user is. This weather temperature is added to the application as a UI label as well as a AR object in the scene view for easier access.
Current time updated by the second as UI element: The current time by the second is implemented and displayed as a UI element. We used the Timer() and Date() functions to create a function that updates the time every second using a completionHandler.
Text to speech when navigating for audio feedback: When you navigate to a place (through any method), the application gives a auditory feedback giving the name of the destination where you want to go. This helps ensure the user picked the correct place and did not select a place in error.
Bookmark favorite places and get quick navigation to them: You can favorite and bookmark places that you can access in the Favorites section. If you favorite a place, the place name is added to a table view. When you press the name in the table view, it starts a navigation view where you can follow the nodes to the destination location.
Used linear regression to separate heights of node based on if two nodes will be occluded to the user: Based on some mathematical principles, we calculated the height of the nodes to minimize occlusion of nodes from the user’s perspective. This is not perfect. However, it is better than any current solution out there. We also tried quadratic regression, randomization of heights, and basing the height on depth of the node. However, linear regression gave us best results. Also, the regression is based on if the node can be seen through the user’s viewpoint. More on this is provided below.
Scaling is based on depth value in Z dimension (hypotenuse): The scale of the nodes are primarily based on how far the node is (in the Z direction). This prevents the autoresizing and scaling that ARKit does due to the way it renders node. This means, the user sees the same scale for almost every node the application renders.
Tap to call establishment from the detailed view to a place: You can tap the phone number in the detailed view to place a call to the establishment. This can be useful if the user wants to check if a restaurant is open or if more information is needed.
Tap to go to website of the place from the detailed view: The user can tap on the website to open the establishment’s website to get more information. This can be useful when the user is not sure if the establishment is the one he wants and cannot figure out even with photos. Share your current location using any 3rd party app: The user can tap on the share button in the main circular menu to access a UIActivityViewController or what we commonly call a ‘sharesheet’. This sharesheet provides access to various application such as Facebook, Whatsapp, etc and a string is passed stating where the user is in latitude and longitude. Many applications nowadays parse latitude and longitude data as a location and prompt the user to open a map.
Favorite locations: Often we have the need to save locations which we like or frequently travel to sao that we don’t have to search them again and again. In this app we have added a feature to favorite a location from the detailed view by pressing the star button at the end of detailed view. The details of the location is saved in a SQLite database(Core data). From the main menu in the screen, one can access the list of favorite places saved from detailed view. If one wants to remove the place from favorites list, user can tap on the star in detailed view or do a swipe to delete action in the favorites listview.
Frameworks Used:
AVFoundation: The AVFoundation framework by Apple provides a way for developers to process audio, configure system audio, control device cameras, and work with audiovisual assets. In our application, we used AVFoundation primarily to implement the “text-to-speech” feature. This feature is prevalent when the user wants to navigate and the navigation view appears. The destination name is converted from text to speech using the AVSpeechUtterance, AVSpeechSynthesisVoice, and AVSpeechSynthesizer classes. This enables us to use iOS’s speech capabilities.
UIKit: UIKit is an Apple framework without which not many iOS applications can be created. The framework is prevalent throughout the application. The framework is primarily used to manage graphical data, event based data, and interfaces for the application. We used the framework for resource management (constructing and releasing UIImages, working with Strings, using Storyboard viewcontroller management), customize user interfaces, and include animations wherever needed. In specific, when we get the URL for the location for icons online, we need to generate a UIImage from the data that is received as a PNG. The UIImage generation, storage, resizing, and manipulation all requires UIKit framework. This is just one of many uses of the framework in our application.
ARKit: This is the primary framework of our application without which, AR would not be possible on iOS. The framework integrates iOS device camera and motion features to produce AR experiences. The framework takes care of creating ARSession (shared object that manages device camera and motion processing), ARConfiguration (to implement configurations such as Tracking configuration, Orientation configuration, and Face configuration), and AR scene view generation. We also used ARPlaneAnchors and ARAnchor objects to make sure objects are consistently mapped to the correct location in the ARSCNView object.
SceneKit: SceneKit is the second essential framework used in our application. SceneKit was created primarily for 3D object creation and was used in games and other physics based simulations. However, Apple has allowed developers to use SceneKit and SpriteKit (only for 2D elements) for content generation in AR experiences. The primary class implementations are SCNNodes, SCNReferenceNodes, SCNPlane, and more. We also used SCNGeometry to customize textures, materials, and texts in the SCNNodes that were generated in the AR view. This also allowed us to subclass elements into a tree architecture for object management as well as make them appear on the view as a single node. Apple has made it easy to structure nodes as a tree structure for easier object management.
GooglePlaces: This is another crucial framework that we used in our application. Google’s Places API for iOS is the backbone through which we get our places data. We also use Google’s Places Web Services for initial data gathering. However, for objects such as Search views and filtering, we use the GooglePlaces API. We implemented a GMSPlacesClient object that handles all requests and returns objects of class Places. This Places object contains all information for the requested information. The reason why we didn’t use this API initially is because it does not allow us to search for all places nearby with a given radius. Thus, for that, we used the web services API.
CoreData: We used Core Data to store favorite places in our application. This provides us the ability to store favorites across app instances. If the user closes the application and reopens it, the favorites will still be there. This is also known as ‘persistence storage’. Core Data allows us to manage model layer objects in the application. It also decreases the amount of code needed by 50-70%. Many other features of Core Data can be found online.
CoreLocation: CoreLocation is Apple’s framework that helps the application access data based on iBeacon localization and getting location through the internet (LTE or Wifi). We instantiated a location manager object that provides the geographic location and orientation of the device as well as updates on when location was changed significantly. It also gives us access to the altitude and heading of the user. This can be useful to even more accurately judge the location of the user when dealing with a terraneous environment.
PARTagPicker: We used paulrolfe’s PARTagPicker to implement the filter picker in the Filter view. The tag picker provides an easy way to allow the user to choose tags in an intuitive and accessible manner. The animations feel natural and it also allows the user to deselect filters already selected and add them back to the unselected filter list.
CircularSlider: For the distance slider selector, we used taglia3’s CircularSlider library. The slider provides accurate values, is completely customizable, and is easy to implement. This implementation felt like the most natural way to give the user control over how much distance he wants to select when filtering the view. Only small problem is that the values can vary depending on how slowly or quickly the user uses the slider. More optimization can be done to make that experience more consistent.
GLKit: The GLKit framework gives us access to floating-point matrices, SIMD (single instruction multiple data) instructions, and more. This is absolutely necessary when working with transformation of positions from CLLocation to SCNNode transform property. We shall discuss more about this later. Basically, the relevant matrix transformations are translation, scaling, and rotation. The GLKit framework greatly helps with accomplishing these operations much faster than normal computations.
Mapbox: The Mapbox API is the backbone for the navigation view. It provides us with the map view, destination location estimation, and directions query. We used it to calculate optimal walking routes so that we can use those directions to generate nodes wherever needed. The directions return steps and waypoints. The API by default limits the waypoints to 25. The framework also provides an easy mapview that we implemented to help guide the user wherever map access is easy. This is useful with the navigation view.
MapboxDirections: This framework provides traffic-aware directions from Mapbox in Swift. This makes life easy as it is a Swift wrapper for the Mapbox framework and easy to implement. The directions returned are easy to parse this way as well.
Turf-Swift: Turf is a geospatial engine written in Javascript. We used the Swift port of that. This helps calculate spatial operations, provides data classification and statistical analysis tools, and works well with directions returned from MapboxDirections.
Polyline: The PolyLine encoder helps to encode CLLocationCoordinate2D objects into a polyline. This is greatly useful when creating nodes for navigation every 5+ meters. This is basically path creation made easy so that we can use it to create SCNNodes wherever needed.
Alamofire: Alamofire is the best HTTP request framework made for Swift. It is better than AFNetworking which works only in Objective-C. Alamofire creates closures that can access URLs, JSONs, plists, etc. The requests are chainable, authentication support is allowed, upload and download is easy, and more features are there. We used this library primarily to request data from OpenWeather API, Google Places API, and more. This is more easier than implementing a NSDataTask with URL class objects. That would require more code to ensure data is received successfully.
AlamofireImage: AlamofireImage is the main library used to easily get place icons and place photos without much fuss. The received data is in image format and not much data parsing is required to use images. This library also provides image response serializers, UIImage extensions, image filters, and purging unneeded images in memroy.
CircleMenu: For the main menu, we used Ramotion’s CircleMenu library. It provides easy implementation, excellent icons, and beautiful animations to make user experience a breeze and easy to understand. The buttons are customizable as well as the colors of the buttons.
Challenges Faced and Novel Methods Used:
The scaling & positioning challenge:
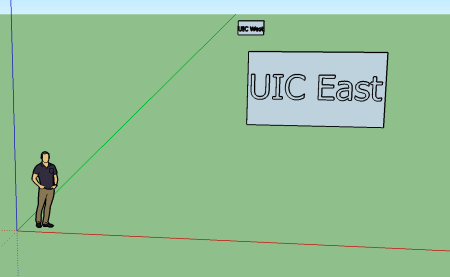
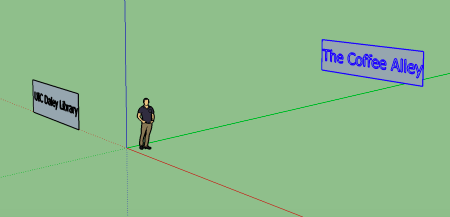
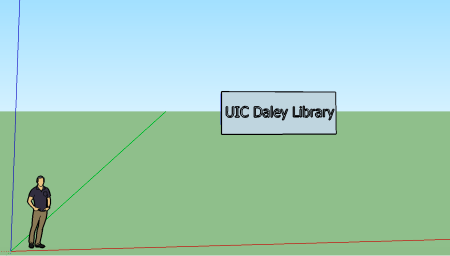
Based on the device’s location, AR nodes for surrounding places are augmented based on the location’s coordinates. Now there can be multiple places in a single direction or a small area. This is usually the case as a busy street tends to have multiple points of interest like bank, coffee shop, restaurants and a saloon etc. If we were looking at the street/area from a distance, all those places would fit in a small visual area. We would point in the same direction for all those places in that street/area. Now when we want to augment nodes of places, all those nodes appear to be crowded in a single direction/area as shown below.
In reality, they are not crowded, they might be one behind the other, or at a different distance horizontally from each other. But as human vision is convergent, the nodes appear to be crowded in a place. For example, If we took a picture of a city’s skyline and be asked to write names of building above them(as in Fig. 1), we’d run out of space in the photograph. Now this does not mean there is a lack of space in real skyline. The problem is the photograph has captured the information of an area far larger than its own size( as seen in the Fig. 2) so as to fit all the buildings in the skyline but you wouldn’t want to scale the names down the way the size of the buildings were. Now this creates the problem that there are too many buildings and you want to write their names in a size which is readable. The logical solution is to write the names in different vertical space. Now this was in 2D on a photograph. The problem we have is exactly same but in 3D real world space which increases the complexity. This is the positioning problem.
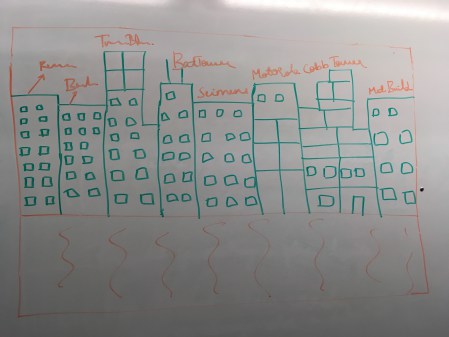
When the nodes are augmented, they are all of the same size. But when a node is 1m away from us, it looks nice but a node 100 m away of same size looks too small to us. This creates scaling problem. The solution would be to increase the size of the nodes based on the distance using some form of regression. But since we already have the positioning problem, increasing the size of the nodes makes the positioning even more worse. So we cannot have individual solutions for scaling and positioning. One solution would get in the way of another. So, this problem demands a solution which can address scaling while keeping positioning in mind and vice versa.

How we did it?
Node creation (Annotations, Detailed View):
We have managed to create nodes after some initial challenges which pushed us to explore probable solutions and finally resolve them by zoning in on a approach. Although ARKit has done a phenomenal job at making Augmented Reality very approachable for developers, there is a dearth of interactive elements other than basic geometric shapes. These basic shapes are useful in developing in SceneKit for Games but not entirely suitable for making an, let’s call it, an ’Augmented Reality UI’. Making annotation views and the detailed view which appeared through Augmented Reality was a challenge we are very satisfied to have overcome after playing around with every shape and API function ARKit allows.
Challenge: Annotation Layout (AR Interface)
- Creating modular annotations in the field of view
- These views needed to be modular due to data that was being pulled and on basis of that they were rendered in real time.
- No proper hierarchy to these objects as there were created independently
- Positioning these nodes correctly to make each group seem like an annotation meant calculation of vague dimensions
- Scale of each node was an issue.
- This included relative scale within the annotation
- Tapping was another problem we had to overcome as interacting with AR elements especially text nodes are a bit problematic
- Due to different initializations of multiple variable and camera state, there arose a need to set a chain of events to initialize, pull data, create nodes dynamically, plot it in the AR Scene and set their orientations correctly.
- Issues like overlapping of multiple nodes and scaling of these nodes with respect to distances was another huge issue which cost us - considerable brainstorming and time albeit, enjoyably so!
- Setting aesthetic qualities like opacity and textures were also a requirement
We solved these challenges after trying multiple solutions put forward by each of us.
For calculating the relative positions of nodes like the title node, distance text node and the Icon, we calculated the size of the complete text node, created a plane with its width with the relative distance of the min and max coordinates. Then we positioned the text node inside this plane. With this data with us, we could plot the distance text node with the same starting point as the Title text node. In addition to the length we included some arbitrary padding within the parent node. Both the nodes were then shifted right by length of the Icon node + some padding again. This managed the layout of the node. We also tried out making a proper hierarchy of each node and made these child nodes
The constant change in orientation of the camera made it hard for us to place the nodes correctly, so we introduced delay within scene changes so that the camera gathers enough features and sets orientation, before placing nodes in the AR scene
We realized that developing within a small room and viewing these nodes in a few meters is very different than real life places which are at a large scale in terms of distance as well as size. After trying different scale sizes, we scale each node in a larger scale, with respect to the distance they were at, greater the distance, the larger the scale had to be for the nodes to be legible. This was done by a regression model.
Overlapping of the nodes: As there were number of nodes in a particular direction which were overlapping, before placing a node, we checked if there are any nodes in that direction using x and z distances of nodes from the camera as below

The two nodes are in same direction if x1 x2 z1z2 . We are not looking for the ratio to be match but an approximation to cover an area in a direction rather than a particular direction. When we consider an area, it introduces redundancies and helps solving the overlapping. So once we know there is already a node in the direction, we increase the y value of the node pushing it up(down for first node in a particular direction) and then store the nodes in a particular direction so as to detect the number of nodes present in a direction as shown below.
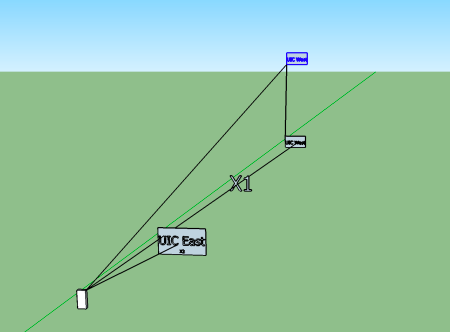
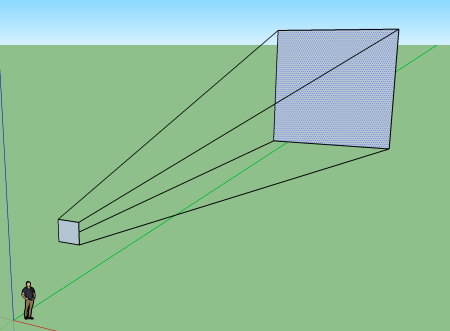
But this creates another problem. Till now we were scaling the size of the nodes based on how far they were(i.e the z value). But now when we shift the nodes in y(vertical) direction, the distance from the phone(viewer) to the node isn’t the z value anymore, it is the hypotenuse of the triangle now formed because of the y scaling as shown below.
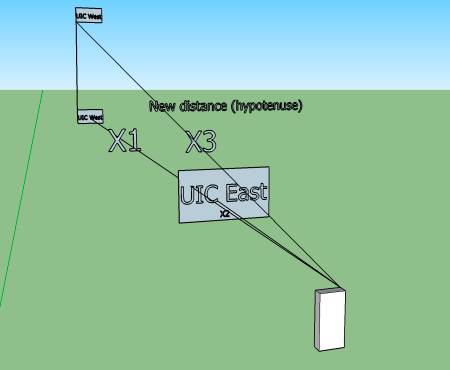
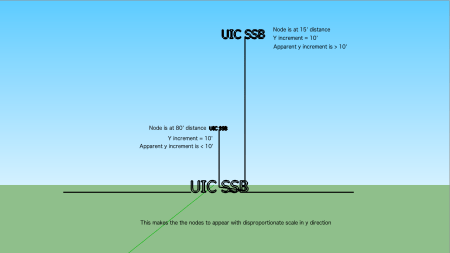
But this introduces another problem. Consider this scenario when there are three nodes in a direction. One with a distance of 5m, another at a distance of 10m and last one at a distance of 200m. Now when I know that there is already a node(one at 5m) in the direction, I push rest of the nodes up by increments of say 20m in y direction. So, the node which is at a distance of 10m when pushed up by 20m looks very different compared to the node which is 200m away which is pushed by 20*2 = 40m as shown below. So this demands an increment of y value based on how far the node is located. One single y increment for all the nodes appears as if nodes were translated in y direction disproportionately. So, we used a regression model to determine a y value increment based on distance of the node to the user.
Another challenge that arose partly due to the API we are consuming is that for multiple filters, Google Places doesn’t allow for multiple filters in a single request. We overcame this by fetching the data for each filter and plotting the annotations once all of the data arrived. The request being an Async request made way for a race condition, which we overcame by using completion handlers, and plotting the nodes Asynchronously for the app to be non blocking. This was one of the many occasions we were faced with race conditions, and had to take ‘detours’ to make sure the sequence of events and co-routines were called in a suitable order.
Challenge: Memory Management
- Memory was a stiff issue in this application as it was easy for the routines to keep creating nodes and use up as much memory. If unchecked this would choke the app and end up in an eventual crash.
- We kept track of creation of nodes and their performance after extensive use of the app which included initial node creation, filtering of the field view navigation and back to the initial view.
- We found out the nodes were getting created and were taking up space in dynamically created arrays and eating up a lot of primary memory.
We solved this by:
- Keeping a check on how many node are being created and limiting the distance so as to render manageable nodes only. Not all places around you can be loaded as it would require considerable amount of processing and memory to handle all those nodes and would drop the frame rate considerably if not crash the app.
- We cleared out nodes in every iteration and re-initialised whenever required. This required us to clear out anchors in the field of view, as well as the nodes that were created. This was easy to miss out as once anchors are removed you don’t see any node and may assume that their memory has been released back which is not the case. So we made sure we delete all unused nodes and release all memory back to be reused.
The control flow is :
Initialise all containers ->
Async request fetching data ->
Callback parsing data ->
creating nodes dynamically based on this data ->
Setting anchor points in the Scene ->
destroying all anchors and nodes once the view is destroyed on changed ->
reinitialising the process again
Challenge: Z-Depth Fighting (Flickering)
Due to multiple planes in the same view, there arose an issue of Z-Depth conflict with planes conflicting with respect to their positions. This can be seen in the form of continuous flickering in the nodes.
Solution:
- We tried to solved the Z-Depth problem by introducing a minute difference in the z-depths of the planes which should have solved the problem. But unfortunately, the continuous updation of the position and orientation of these planes with respect to the user makes it very hard to avoid flickering.This we realise is a known issue in Augmented reality.
- Having mentioned that, differing the Z-Depth made considerable improvements for nearer nodes, but not so much node that were far away. This performance improvement can be seen in the detailed view which is plotted near our position but the flickering still exists in the annotation that are far away, denoted by a red annotation.
FRAMEWORK/HARDWARE Shortcomings:
We also faced certain challenges which were not entirely under our control. Hardware problems like graphic accelerations and sensor readings were something which we can’t change or override. We worked around a few problems by optimising our own development approach as much as we could. One of the challenges we faced was an error that arose due to a sensor:
REFERENCES –
- Whole the apple documentation including ARKit, Swift4, XCode etc.
- StackOverflow for all bugs and issues. Thank god for their amazing community.
- Bob the developer’s blog for completion handlers
Github repositories:
-Tags manager
-Circular Slider
-Polyline
-Turf
-Mapbox
-Alamofire
-AlamofireImage
-Google places for consuming data