
Lets Build a Command Line App in Swift
Published:
With Swift being open source and server side swift gaining more and more traction, command line apps built with swift can be extemely powerful for server side applications. There have been some libraries which helps to build useful command line apps and today we’ll explore few libraries and build a simple command line app.
We’ll build a command line tool to group files of a particular type and move them into a sub directory. For example, taking all png files in a folder and moving them to a sub directory within that folder. We’ll explore three packages from awesomeiOS list on GitHub.
Setting things up…
- Make sure you have the latest version of Swift(4) installed and you can check it using the command swift –version as shown below.
mac:~ username$ swift --version
Apple Swift version 4.0.3 (swiftlang-900.0.74.1 clang-900.0.39.2)
Target: x86_64-apple-macosx10.9
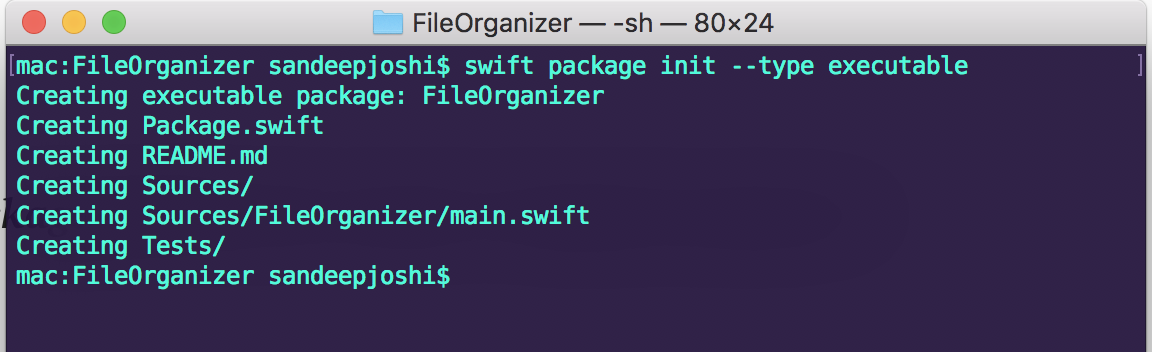
- Now we need to setup a basic Package structure using the command swift package init –type executable. Note that the command will create a package with the same name as the present working directory. As you can see in Fig 1, the command creates a directory structure.
One of the file created is Package.swift which contains 3 important aspects of the package
Products: The executables and libraries which are the end products of the package
Dependencies: All the other libraries which we’ll use in this package
Targets: These are basic blocks of the package like test suite or the main module, and can be interdependent. Like the test suite refers to the main source module. Moving on to the source file, Swift has a simple hello world boilerplate code in the source file. A look at the main.swift is as below
print("Hello, world!")
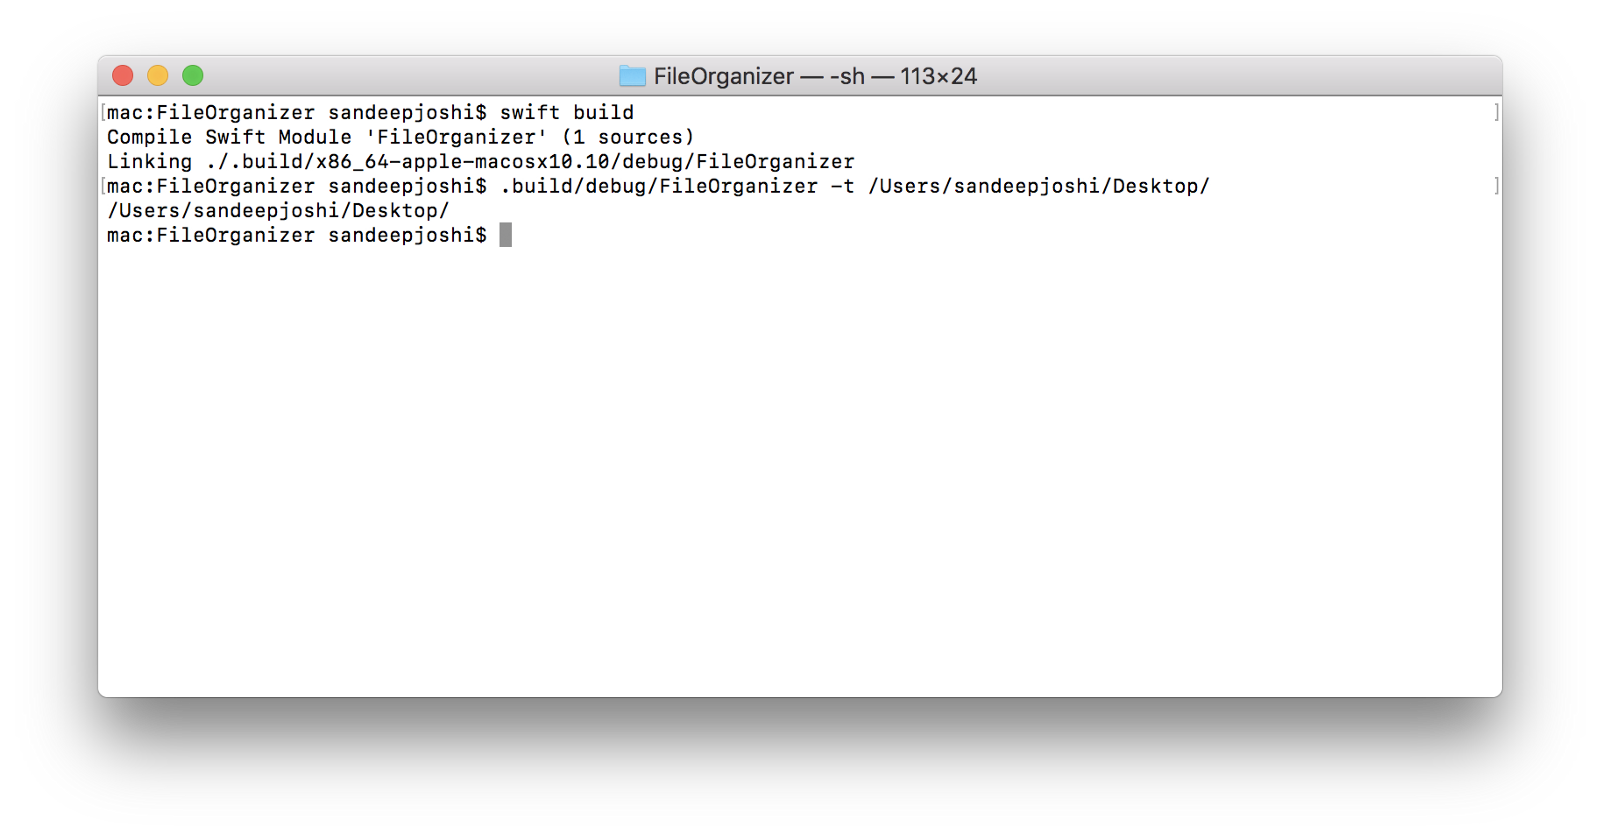
We can now build the package and make sure there are no issues. swift build command will compile all the modules and handle the dependencies in the Package.swift file.
mac:FileOrganizer sandeepjoshi$ swift build
Compile Swift Module 'FileOrganizer' (1 sources)
Linking ./.build/x86_64-apple-macosx10.10/debug/FileOrganizer
Now running the executable FileOrganizer in the debug directory should print Hello World
mac:FileOrganizer sandeepjoshi$ .build/debug/FileOrganizer
Hello, world!
Now that we have basic package setup, lets use some libraries and build the tool.
Adding dependencies
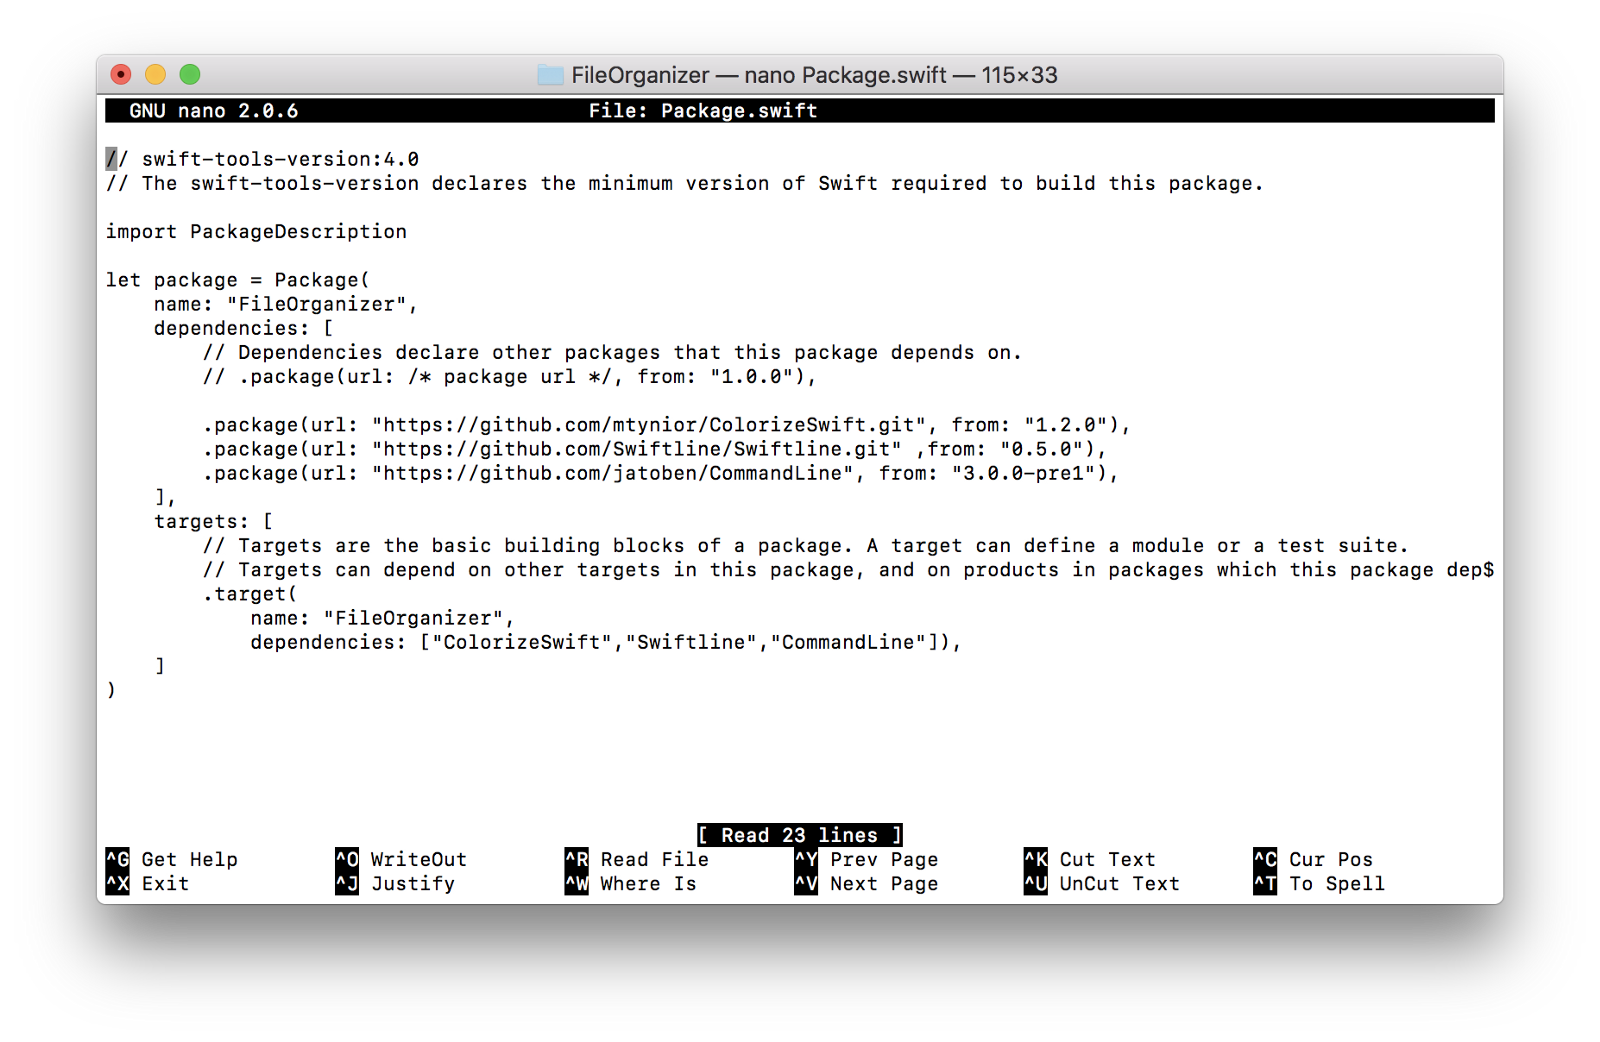
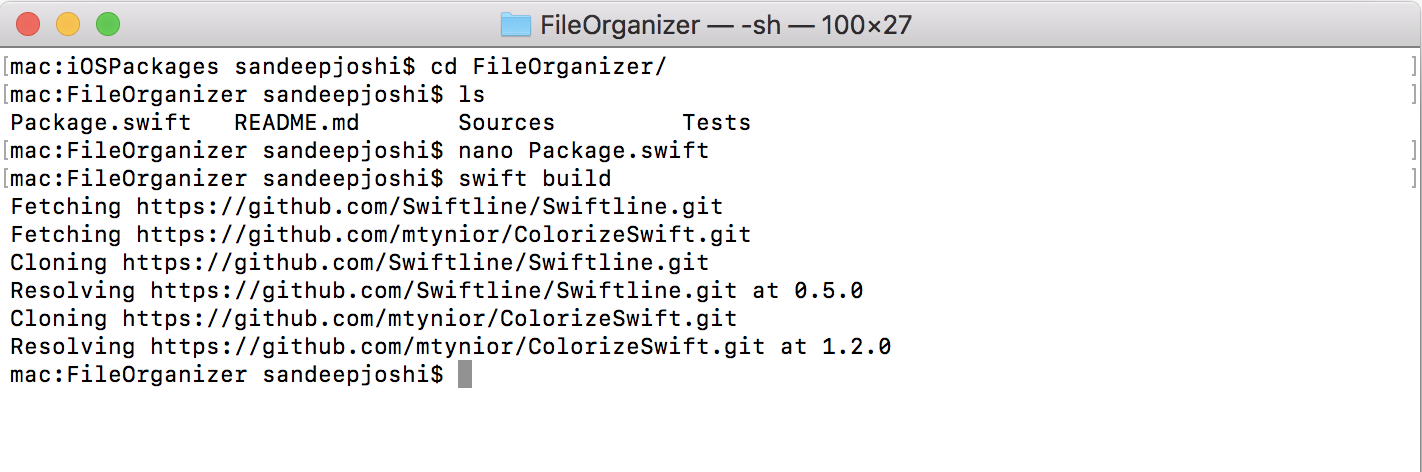
For this project we’ll use three command line libraries/packages from awesomeiOS list on GitHub. To add a package, we need to edit the manifest file Package.swift as in Fig 2 and then swift build command will fetch, clone and resolve the added packages as shown in Fig 3.
Edit the Package.swift file like the one below
// swift-tools-version:4.0
// The swift-tools-version declares the minimum version of Swift required to build this package.
import PackageDescription

let package = Package(
    name: "FileOrganizer",
    dependencies: [
        // Dependencies declare other packages that this package depends on.
        // .package(url: /* package url */, from: "1.0.0"),
	.package(url: "https://github.com/mtynior/ColorizeSwift.git", from: "1.2.0"),
	.package(url: "https://github.com/Swiftline/Swiftline.git" ,from: "0.5.0"),
	.package(url: "https://github.com/jatoben/CommandLine", from: "3.0.0-pre1"),
    ],
    targets: [
        // Targets are the basic building blocks of a package. A target can define a module or a test suite.
        // Targets can depend on other targets in this package, and on products in packages which this package depends on.
        .target(
            name: "FileOrganizer",
            dependencies: ["ColorizeSwift","Swiftline","CommandLine"]),
    ]
)
Note: Adding a package in Package.swift for older swift versions has a slightly different syntax and this will not work.
Building the tool
The package CommandLineKit is used as a base package to create the command with an option to get input as a string. The following code takes a directory path as an input for the specified option
import Foundation
import Swiftline
import ColorizeSwift
import CommandLineKit
let cli = CommandLineKit.CommandLine()
let dirPath = StringOption(shortFlag: “t”, longFlag: “filetypes”, helpMessage: “List all the types of files in current directory”)
cli.addOptions(dirPath)
do {
  try cli.parse()
} catch {
  cli.printUsage(error)
}
print(dirPath.value!)
Lets build and run this code and you should get an output similar to the one below.
So the CommandLineKit package gives a class Commandline which is analogous to any bash command and an instance of StringOption is analogous to an option for a typical command. So we instantiate string option(s) and add it to the option list of the commandline instance.
Now lets find all the available file types in that directory. We’ll use FileManager to get fileUrls of all the files in the directory and get the extensions of the files. Finally an array is created to store the unique file types/extensions. The following code does just that. Remove the print statement from the code above and paste the following code.
var extensions = [String]() // Array to hold types of files present in the given directory
let fileManager = FileManager.default
let dirURL = URL(fileURLWithPath: dirPath.value!)
do {
// fileURLs contains urls of all the files in the given directory
let fileURLs = try fileManager.contentsOfDirectory(at: dirURL, includingPropertiesForKeys: nil)
// Getting the unique file types
for file in fileURLs {
if !extensions.contains(file.pathExtension) {
extensions.append(file.pathExtension)
}
}
// To remove a empty string at the begining
extensions.remove(at: 0)
print(“\n”)
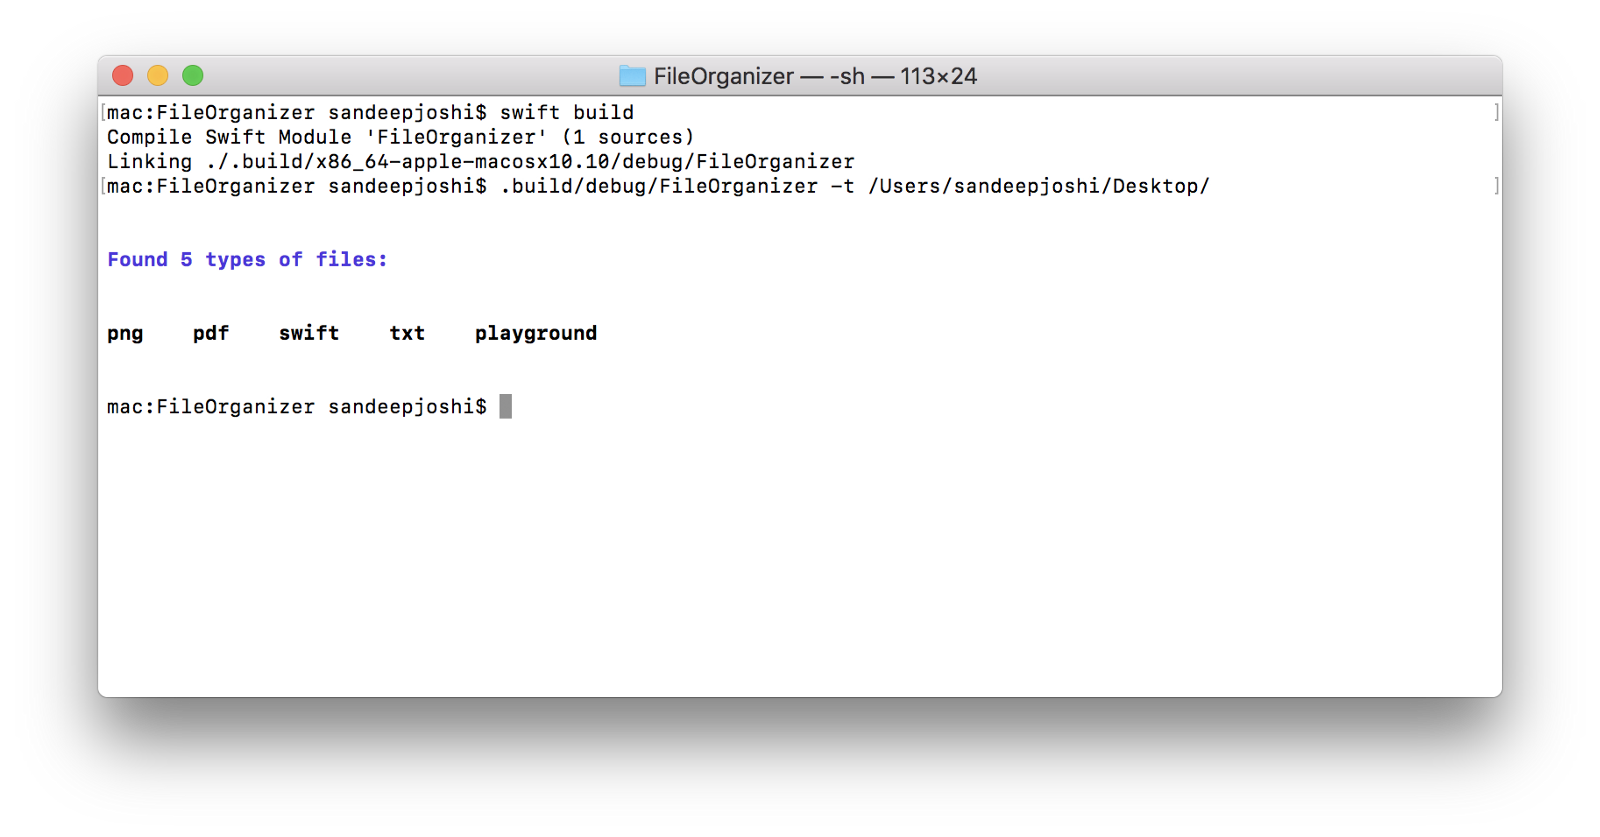
print(“Found \(extensions.count) types of files:”.bold().blue())
print(“\n”)
print(extensions.joined(separator: “ “).bold())
} catch {
print("Error while enumerating files \(error.localizedDescription)")
}
Upon building and running the code now should produce an output similar to the one below —
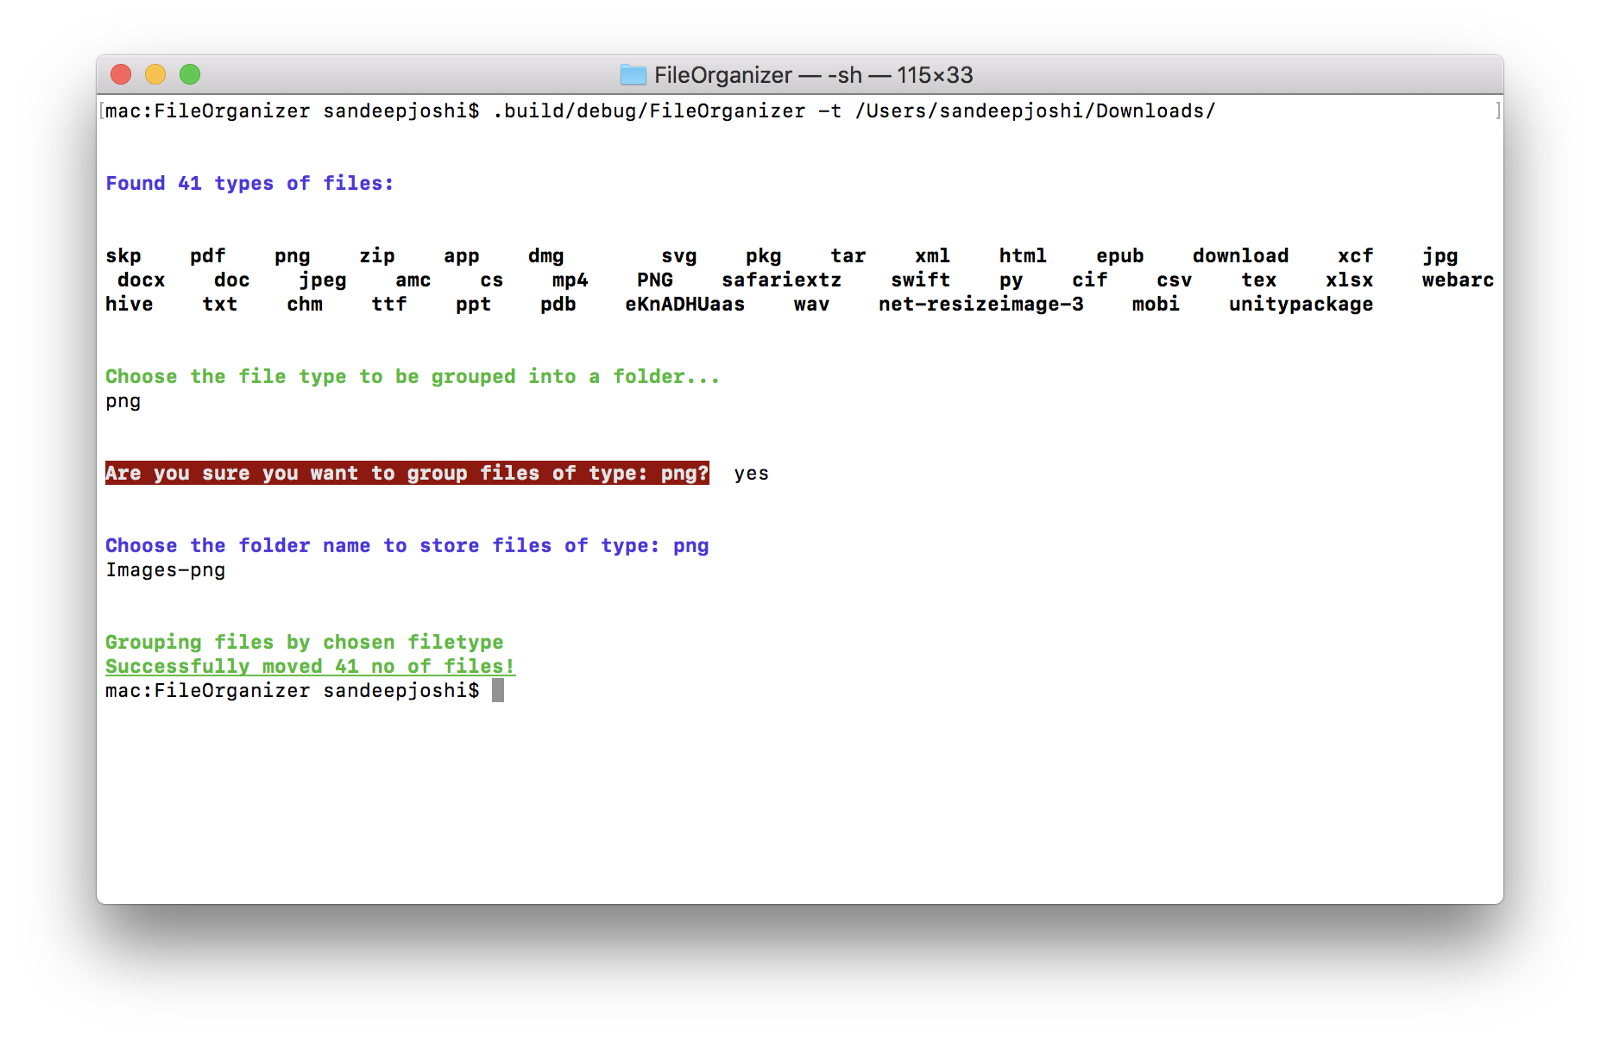
Now using the SwiftLine package, we can ask the user which type of files should be grouped and moved into a subfolder. ask is a method provided by SwiftLine which presents a prompt and accepts the entered string.
let fileType = ask(“Choose the file type to be grouped into a folder…”.bold().green())
Again using another method agree of SwiftLine, we can confirm if the user really wants to group files of the entered type.
let choice = agree(“Are you sure you want to group files of type: \(fileType)?”.bold().white().onRed())
Now we just check the user’s choice and ask user for the name of the subdirectory and move the files of that type to the newly created subdirectory. Consolidating the above two code snippets, below is the code which needs to be added after printing the file types/extensions.
.
.
print(extensions.joined(separator: “ “).bold())
let fileType = ask("Choose the file type to be grouped into a folder...".bold().green())
    print("\n")
    let choice = agree("Are you sure you want to group files of type: \(fileType)?".bold().white().onRed())
    if(choice == true) {
      print("\n")
      let dirName = ask("Choose the folder name to store files of type: \(fileType)".bold().blue())
      print("\n")
      print("Grouping files by chosen filetype".bold().green())
      let baseDirPath = dirPath.value!
      let newDirPath = baseDirPath + dirName + "/"
      let _ = run("mkdir" ,args: newDirPath)
var noOfFilesMoved = 0
      for file in fileURLs {
        if (file.pathExtension == fileType) {
          do {
              try fileManager.moveItem(atPath:file.path, toPath: newDirPath+file.lastPathComponent)
              noOfFilesMoved = noOfFilesMoved + 1
              }
              catch let error as NSError {
              print("Ooops! Couldn't move the file: \(file.lastPathComponent) because of error: \(error)")
              }
          }
      }
      print("\n")
      print("Successfully moved \(noOfFilesMoved) no of files!".underline().bold().green())
}
The complete Main.swift looks like this -
// Created by Sandeep Joshi on 10/1/2018.
import Foundation

// Import the 3 libraries added in Swift.package file
import Swiftline
import ColorizeSwift
import CommandLineKit


let cli = CommandLineKit.CommandLine()

let dirPath = StringOption(shortFlag: "t", longFlag: "filetypes", helpMessage: "List all the types of files in current directory")

cli.addOptions(dirPath)

do {
  try cli.parse()
} catch {
  cli.printUsage(error)
}


var extensions  = [String]()   // Array to hold types of files present in the given directory
let fileManager = FileManager.default
let dirURL      = URL(fileURLWithPath: dirPath.value!)
do {
    // fileURLs contains urls of all the files in the given directory
    let fileURLs = try fileManager.contentsOfDirectory(at: dirURL, includingPropertiesForKeys: nil)

    // Getting the unique file types
    for file in fileURLs {
        if !extensions.contains(file.pathExtension) {
            extensions.append(file.pathExtension)
        }
    }
    extensions.remove(at: 0) // To remove a empty string at the begining
    print("\n")
    print("Found \(extensions.count) types of files:".bold().blue())
    print("\n")
    print(extensions.joined(separator: "    ").bold())
    print("\n")
    let fileType = ask("Choose the file type to be grouped into a folder...".bold().green())
    print("\n")
    let choice = agree("Are you sure you want to group files of type: \(fileType)?".bold().white().onRed())
    if(choice == true) {
      print("\n")
      let dirName = ask("Choose the folder name to store files of type: \(fileType)".bold().blue())
      print("\n")
      print("Grouping files by chosen filetype".bold().green())
      let baseDirPath = dirPath.value!
      let newDirPath = baseDirPath + dirName + "/"
      let _ = run("mkdir" ,args: newDirPath)

      var noOfFilesMoved = 0
      for file in fileURLs {
        if (file.pathExtension == fileType) {
          do {
              try fileManager.moveItem(atPath:file.path, toPath: newDirPath+file.lastPathComponent)
              noOfFilesMoved = noOfFilesMoved + 1
              }
              catch let error as NSError {
              print("Ooops! Couldn't move the file: \(file.lastPathComponent) because of error: \(error)")
              }
          }
      }
      print("\n")
      print("Successfully moved \(noOfFilesMoved) no of files!".underline().bold().green())

    }
} catch {
    print("Error while enumerating files \(error.localizedDescription)")
}
Upon building and running this, the output should look something like this..
mac:FileOrganizer sandeepjoshi$ swift build
Compile Swift Module ‘FileOrganizer’ (1 sources)
Linking ./.build/x86_64-apple-macosx10.10/debug/FileOrganizer
Note: As you can see, the prompts and output is styled. I have used the ColorizeSwift package to style the strings which are pretty straightforward and as simple as calling a method on a string. Check out the resources below for more information on this.
Obviously there can be a ton of improvements in this tool. This should serve as a good starting point to build command line apps in Swift.
Resources:
More info on installing & debugging Swift and using SwiftPM on Swift.org
- CommandLineKit Package
- SwiftLine Package
- ColorizeSwift Package